

12:21 AM
Monday, September 9, 2019
Friday, June 28, 2019
SEO
6:39 AM
How to write a completely Seo friendly post in the blog?
How to write SEO Ready Post in Blogger?
Hello friends, there will be no blogger that will not be heard about SEO. If you are a new blogger you must have heard or written from someone's mouth. Because blog is the best way to get traffic into a blog for SEO. So ham in this post is going to talk about how to write Completely SEO Friendly Posts in the blog?
 |
| How to write a completely friendly post in the blog? |
Friends My name is Abhishek and my blog is https://technicaltips003.blogspot.com and this is my first post on technicaltips003 . How do you complete your blog in blogger or WordPress today? I am about to give information about this. If you are on WordPress then you can seo your post with the help of Yost plugin but if you are on a blogger then you have to manually seo your post.
SEO is very important for every blogger. Because search engine is the only way, so that blog can do unlimited traffic drive. Its best thing is that it is absolutely free. That is, you can gain millions of traffic in a blog without money invested. Let's not take too much time, we move on to our topic.
1. Blog's Title
The most important portion of Seo is the title of your post. When you write the title of the post, you must also use at least 1 or 2 keywords in it and also use some special word in title such as Best, Useful, Using top 5, top 10, important, etc. people are excited to read your post and you get more views. If you do title seo, you can complicate up to 40% of the entire post.
2. Blog Description
When you search in a post search engine, it shows you a few words at the bottom of the title. The description of the post is titled After the title, this post is considered to be very necessary for seo, in which you can use 4-5 keywords. And your description will be as good as possible, you will get the chance to get more views, so you should write a description related to the keywords and post in your post, it will rank very well.
3. Applying Image to Post
Generally all bloggers use an image in their blog post, it is considered to be very important for your post. And many professional bloggers believe that an image seo your post as 1000 words and when you use the image in the blog, keep in mind that it should not be copyrighted in any way and the photo is well-edited Only after posting and resize the photo also will not affect your blog's loading speed.
4. Word Length
Your post size for SEO is of great significance. Google also wants that more word post should be given a better rank, so that people can get good and complete information and at least 800-1000 You must use words that you can count the words of your post with the help of word counter tools.
5. Internal Links
When we write post, there is an option to add links to it. Where visitors can access from one post to another post, you should use this feature in your post. You can also link related to your post in the post of that post, so that your visitors can read your second post too. SEO is beneficial for both, so please use the internal link in all your posts.
6. Heading of Post
Both Blogger and WordPress have the feature to use heading. You can seo your post to a great extent by using heading, sub heading and mirror heading. The chance of having your post rank increases by using the right heading, you can get at least 2 subheadings in your post. 5 mirror heading must be used
7. Keyword
Most bloggers are not aware of keywords, so they do not get much views in their post. Keywords are words that can be searched more on the search engine, you can find out from Google keywords planner tools and if you want you can search keywords from other tools. You should use more and more keywords in the first and last paragraph of your post and 10-12 keywords in a post are good for seo.
8. Post Sharing
Almost all the people who post a post on blog post it on social media to increase their view. This is called off page seo. It is also important to get a good rank in google if you want to get more views on your post. So share your post to a social account such as Facebook, Twitter, google + etc, it will give your post a good rank. If you have any other social account page, group etc. then you can also share your post.
9. Using Alt Tag in Image
When you put an image in the post, you see an option to use alt tag. Many people would not know about it but using it can make any image of yours seo ready. When you upload an image Then there will be option of alt tag, by clicking on it, you can add any related keyword to alt tag and title tag in your post. This makes pure post seo ready.
10. Post URL
When you write the title of the post, its URL becomes automatically generated but it is not so good for seo, in which you see the option to edit the URL, in which you can change the URL of your post and the URL of your post You can make seo ready before you publish any of your posts and change the URL in it and use at least one of the keywords in the URL
If you keep these things in mind while writing a post, you will surely be able to post your post engine. Finally, I would like to say one thing that while keeping the post, keep your readers in mind and not the search engine. Because the search engine does the same post, which readers have liked.
For any other information you can comment on us
Thank you for reading!
Tuesday, June 25, 2019
Gadgets
7:02 AM
5 best google products you should buy anytime
5 GOOGLE PRODUCTS THAT WILL MAKE YOUR LIFE EASIER
From the magnificent Pixel cell phone to the Home brilliant speaker, Google offers a bunch of cool and well-valued tech items that will make your every day life simpler.

5 GOOGLE PRODUCTS THAT WILL MAKE YOUR LIFE EASIER
1.Google pixel 3 and Pixel 3 Xl
5 GOOGLE PRODUCTS THAT WILL MAKE YOUR LIFE EASIER
From the magnificent Pixel cell phone to the Home brilliant speaker, Google offers a bunch of cool and well-valued tech items that will make your every day life simpler.
 |
5 GOOGLE PRODUCTS THAT WILL MAKE YOUR LIFE EASIER
|
 |
Google pixel 3 and Pixel 3 Xl |
Google's own Pixel 3a and Pixel 3a XL are helpfully the most energizing new Android telephones to dispatch so far this year. They have a truly cool structure, strong specs and execution, a standout amongst the best cameras in the business, and a phenomenal Android client involvement with years of ensured refreshes. Above all, the couple of telephones have sticker prices that are basically difficult to stand up to!
You can pick between the reduced Pixel 3a with a 5.6-inch show, or the greater Pixel 3a XL with a 6-inch screen. Google offers the telephones in a trio of hues: Just Black, Clearly White, and Purple-ish.
2. Google Home hub
 |
| Google home hub |
One of our preferred Google Home Hub highlights is its capacity to adjust with your collections on Google Photos and show the photographs when not being used. The gadget is likewise an amazing associated home center point — it's perfect with a large group of the present most mainstream keen home items.
The Google Home Hub got high survey scores from CNET and The Verge. Analyzers preferred the gadget's touch-screen usefulness, just as its consistent capacity to associate with associated home items.
3. Google Pixel Slate Chrome OS Tablet
 |
Google Pixel Slate Chrome OS Tablet |
The Google Pixel Slate is the tech mammoth's 2018 ideal example for the Chrome OS stage. The rich tablet has a dynamic 12.3-inch contact screen, a wide choice of Intel processors, a couple of USB-C ports, as long as 12 hours of battery life, and quick charging capacities among its key highlights.
To make the most out of the Google Slate's profitability capacities, we recommend that you pair it with a discretionary illuminated console spread. The gadget is likewise perfect with the Pixelbook Pen stylus.
4. Google Home Max Smart Speaker
 |
Google Home Max Smart Speaker |
The Google Home Max is a Google Assistant-controlled savvy speaker that packs a genuine sound punch, kindness of a team of 4.5-inch subwoofers and two 0.7-inch custom tweeters. The best part is that by utilizing its quad-center processor and six inherent mouthpieces, the speaker will naturally tune itself to dependably convey the most ideal sound understanding for the substance you're playing.
Notwithstanding Wi-Fi network with Chromecast and multiroom sound help, the Google Home Max likewise offers you the choice to match your preferred gadgets by means of Bluetooth. In the event that you are searching for a much greater sound, you can combine two Google Home Max units in a stereo setup.
5. Nest Cam IQ Indoor Security Camera
 |
Nest Cam IQ Indoor Security Camera |
The Nest Cam IQ is a perfectly structured and inconceivably astute home surveillance camera that can perceive faces. This empowers the gadget to caution you if there's an outsider in your home. The camera likewise has the Google Assistant implicit, so you can utilize it as a brilliant home center point.
The Nest Cam IQ has a 4K HDR-proficient sensor — it empowers the camera to catch Full HD film and zoom toward an article with astounding outcomes. The contraption likewise underpins two-way correspondence by means of implicit receivers and an amazing speaker. An open air variation with a waterproof body is likewise accessible.
Thank you for reading!
Friday, June 21, 2019
Blogging
2:32 AM
Blog Me Google Forms Ko Contact Form Me Kaise Use Kare
WordPress Me Google Form Se Without Plugin Contact Form Kaise Add Kare? In this post we are about to talk about this. Do you use a plugin for a contact form in your blog? If yes, then I will just say it to you. Stop using it from today. Today we will tell you a little bit about how the Contact Form plugin is killing your site. Read this post carefully so that you can understand it well.
 Google Form is a great service, which Google has created. It offers us lots of functions and backup options. If you already have a Google account (any Google service account, like Gmail, Google Calendar, YouTube, Google plus etc) you can easily access it.
If you use a contact form plugin in your blog like, Contact Form 7, Jetpack, Ninja Forms, WP Forms, etc, it affects the performance of your site. I have tried using all these plugins as well, so I am telling you this. If you have used it, you will know yourself that it also affects the loading of the site a little too.
Actually, javascript is very much used in all Forms plugin, css. You only know that CSS and javascript are the slow language script. You can activate any contact form plugin and check the source code of your blog. There will be a lot of js, css file load link. This will tell you how much impact the contact form is.
If you use a free contact form plugin, you will not get more options and access. If you need more options and access then you have to purchase paid plugin. In which you will get more than 5000 ंगे.
In my case, I used the first contact form plugins but since it started to have negative impact on my site, I decided to remove it. I use the Google Forms plugin right now in my blog. If you also use it once, then I sure will not think of any other plugin.
In this post, we are going to tell you how to add a contact form through Google Forms in the WordPress or Blogger blog? We tell you in short that we have to do some customization in Google Forms and get a code that has to be added to our blog. That's all, let's know from the beginning.
As we have also said above, Google Form is Google's only one service that is absolutely free. Anyone can create a form in their own Google Account. These forms can be used for any questions you ask, collect contact information, host quizzes, accept orders, get uploads, and more.
When a form submissions, Google Drive is saved in the cloud. When you create a form in it, there are lots of templates here. You can use it to collect any kind of information. The best part is that you can use it as a contact form in your blog too.
You can also use this form if you are a youtuber. After creating the form, there you will find a URL that you can share with anyone. You can add that URL to your YouTube channel. This will allow your viewers to contact you.
After reading in the above, you may have come to know about Google Forms. Now you also want to know why use it? First of all we tell you that there are all the features in a paid forms plugin but it is free. There are so many options available, so you can easily customize the form. Now you are telling about its features in the details below.
You can manage this complete event registration in this.
In this you can create poll.
You can collect emails for Newsletter in it.
In this you can create pop quiz.
You can use many different types of template in your form.
Multiple choice options
Dropdown Options
Text, URL, email verification field.
You can also add images and Youtube videos.
It has lots of free Ad-Ons, which can be used to create a very good form.
You can also use it as an conduct survey.
You can use it for feedback from your visitors.
How to use Google Form for Blog Contact Us Form?
If you use a plugin for a contact form in your blog, try it once. Now, we are going to tell you step by step about this. We will try to tell you the best so that you can understand it with a good understanding. If there is any confusion then tell it in comment.
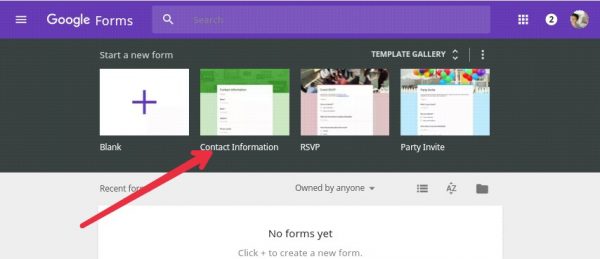
Step 1: First go to Google Forms and sign in with your Google Account.
Now the top templates will have Contact Information, click on it.
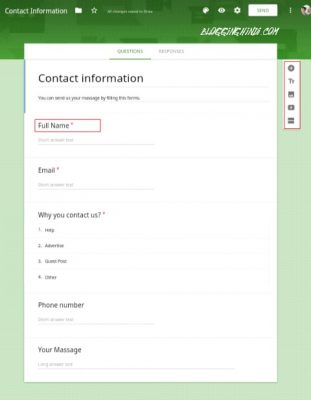
 Step 2: Now here's the field of Your Name, Email, Address, Website, Comment. You can also customize them. In the front right side there will be a toolbar, from there you can add any new option, text, image, video and section in the form.
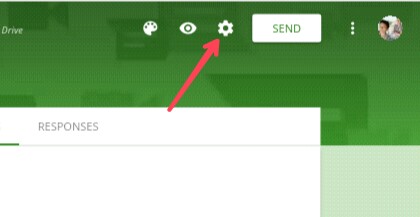
 Step 3: Now you will have to do some sittings cli on top Sittings gear icon for it Click here.
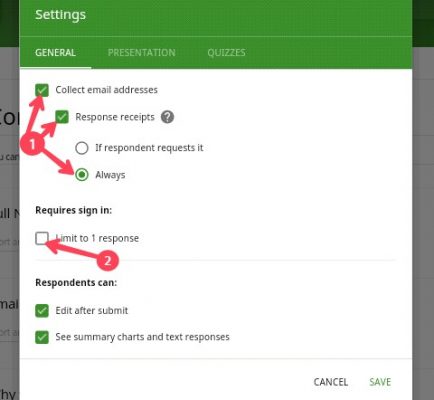
 General Sitting: Here you sit in something like this.
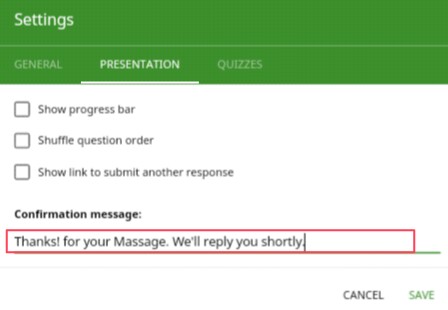
 Presentation Sitting: When you submit a form, you can customize its confirmation massage from here.
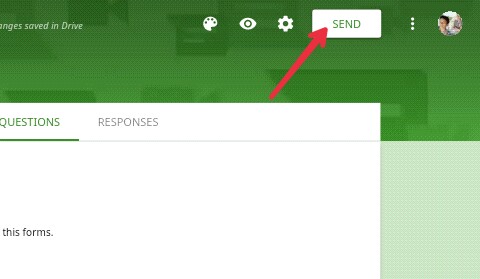
 Step 3: When you have customized the form well Next, you have to click the SEND button in the top side.

Step 4: Now here you will find 3 options. With the first option you can send someone a contact form via mail, another option will be linked, you can use it for your youtube channel and you will have to click on the third option "<>".
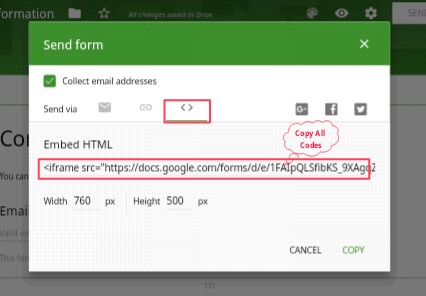
You can customize the contact form also width and height here.
There will be some codes, copy them.

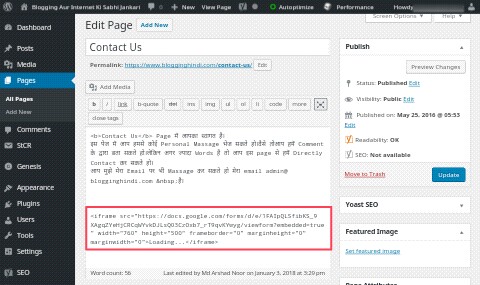
Step 5: The HTML code you have copied will need to be added to the Contact Us page of your blog. You can also add code to widget. We are adding that form to your blog's contact us page here.

In this way you can use Google Forms in your blog's contact us page. Normally, just when someone will massage you, its notification will not be available in the email. If you want to receive the notification in your email, you can use Email Notification for forms Ad-on.
Finally, if you have not used it, then I will tell you to try it. If you still have any confusion then tell in comment. If you like posting then please share it in social media.
Thank you for reading!

If you use a contact form plugin in your blog like, Contact Form 7, Jetpack, Ninja Forms, WP Forms, etc, it affects the performance of your site. I have tried using all these plugins as well, so I am telling you this. If you have used it, you will know yourself that it also affects the loading of the site a little too.
Actually, javascript is very much used in all Forms plugin, css. You only know that CSS and javascript are the slow language script. You can activate any contact form plugin and check the source code of your blog. There will be a lot of js, css file load link. This will tell you how much impact the contact form is.
If you use a free contact form plugin, you will not get more options and access. If you need more options and access then you have to purchase paid plugin. In which you will get more than 5000 ंगे.
In my case, I used the first contact form plugins but since it started to have negative impact on my site, I decided to remove it. I use the Google Forms plugin right now in my blog. If you also use it once, then I sure will not think of any other plugin.
In this post, we are going to tell you how to add a contact form through Google Forms in the WordPress or Blogger blog? We tell you in short that we have to do some customization in Google Forms and get a code that has to be added to our blog. That's all, let's know from the beginning.
What is Google Form?
As we have also said above, Google Form is Google's only one service that is absolutely free. Anyone can create a form in their own Google Account. These forms can be used for any questions you ask, collect contact information, host quizzes, accept orders, get uploads, and more.
When a form submissions, Google Drive is saved in the cloud. When you create a form in it, there are lots of templates here. You can use it to collect any kind of information. The best part is that you can use it as a contact form in your blog too.
You can also use this form if you are a youtuber. After creating the form, there you will find a URL that you can share with anyone. You can add that URL to your YouTube channel. This will allow your viewers to contact you.
Why Use Google Forms?
After reading in the above, you may have come to know about Google Forms. Now you also want to know why use it? First of all we tell you that there are all the features in a paid forms plugin but it is free. There are so many options available, so you can easily customize the form. Now you are telling about its features in the details below.
You can manage this complete event registration in this.
In this you can create poll.
You can collect emails for Newsletter in it.
In this you can create pop quiz.
You can use many different types of template in your form.
Multiple choice options
Dropdown Options
Text, URL, email verification field.
You can also add images and Youtube videos.
It has lots of free Ad-Ons, which can be used to create a very good form.
You can also use it as an conduct survey.
You can use it for feedback from your visitors.
How to use Google Form for Blog Contact Us Form?
If you use a plugin for a contact form in your blog, try it once. Now, we are going to tell you step by step about this. We will try to tell you the best so that you can understand it with a good understanding. If there is any confusion then tell it in comment.
Step 1: First go to Google Forms and sign in with your Google Account.
Now the top templates will have Contact Information, click on it.
Step 2: Now here's the field of Your Name, Email, Address, Website, Comment. You can also customize them. In the front right side there will be a toolbar, from there you can add any new option, text, image, video and section in the form.Step 3: Now you will have to do some sittings cli on top Sittings gear icon for it Click here.- If you want to collect responder's email then tick on Collect Email Address.
- Unitick (×) the Limit to 1 response.
Presentation Sitting: When you submit a form, you can customize its confirmation massage from here.
Step 4: Now here you will find 3 options. With the first option you can send someone a contact form via mail, another option will be linked, you can use it for your youtube channel and you will have to click on the third option "<>".
You can customize the contact form also width and height here.
There will be some codes, copy them.

Step 5: The HTML code you have copied will need to be added to the Contact Us page of your blog. You can also add code to widget. We are adding that form to your blog's contact us page here.

In this way you can use Google Forms in your blog's contact us page. Normally, just when someone will massage you, its notification will not be available in the email. If you want to receive the notification in your email, you can use Email Notification for forms Ad-on.
Finally, if you have not used it, then I will tell you to try it. If you still have any confusion then tell in comment. If you like posting then please share it in social media.
Thank you for reading!
Thursday, June 20, 2019
Tip & tricks
11:33 PM
Instructions To Receive Files From Android To Pc In ShareIt App…!!!
Moving Files From Android To Computer Using USB Cable Right, Yes Offcourse Many of Us Are Using USB Cable To Transfer/Receive Files From Android Device To Computer And That The Easiest And Fastest Way To Transfer Files BUT Sometimes It Depends On USB Cable Version If The USB Cable Is 2.0 It Will Take a Little Bit Of Time While Transferring Heavy Files Speed rate Will Decrease. A significant number Of Us Are Faced This Problem..??? There Are Many Way To Share And Receive Files From Android To Computer. Be that as it may, We Use Only USB Transfer.
 |
| How To Receive Files From Android To Pc In ShareIt App…!!! |
All things considered, We All Using ShareIt App In Our Device And That The One Of The Best App For Files Sharing Across Android Device. We Think ShareIt Will Share File Only On Android To Android Device BUT It's Wrong We Can Share Files Across Three Platforms Android/Computer/iOS Devices. You Had a Small Doubt On How To Share Files From Android To Pc In ShareIt. All You Need To Do Is Simple Follow The Article " How To Share And Receive Files From Android To Pc In ShareIt App… !!! ".
Here Is The Way To Go:
- Download ShareIt Application In Your PC Or Click Here To shareit Without blueStacks Software. Select Your Platform To Download To APP.
Introduce The ShareIt In Your Computer.
- In case You're Using Laptop Turn On Your Wifi Connection By Pressing Wifi Button In Laptop.
- On the off chance that Computer You Need a Wifi Connectivity ( Wifi Router/USB Wifi ) To Share And Receive Files.
Offer Files From Android To Computer
- Open The ShareIt In Your Both Android And Computer Devices.
- Interface Your Android Device To Same Wifi Network Which Is Your Computer.
- Tap On The Send Button To Select Files To Share And Click On The Next Button.
- In the wake of Tapping There You Can See an Option Connect To PC Tap On It a PoP-Up Message Will Appears Click Go.
- Run Your ShareIt Application In Computer To See The Receiver In Android Device.
- Tap On It To See Connecting To ****PC, Accept The Request In Your ShareIt Application.
- Instructions to Share And Receive Files From Android To Pc In ShareIt App...!!!.png
- Every one of The Files That You Shared With Computer Has Been Transferred To Computer.
To View, All Your Shared Files Get Into Folder Download And Navigate To The New Folder Created/Named As ShareIt.
To Share Files From Computer To Android
- Open The ShareIt In Your Both Computer And Android Devices.
- As Show On Above Connect Your Android Device To Same Wifi Network Which Is Your Computer.
- Tap On The Receive Button And Click On The Option Connect To Pc [ Enable The Permissions If Asked ].
- The Sender Image Will Appears Tap On It To Connect With Your Computer.
- Select Your Files To Share [or] Simply Drag And Drop Your Files To Share With Your Android Device.
Instructions to Share And Receive Files From Android To Pc In ShareIt App...!!!1.png
Instructions to SHare And Receive Files From Android To PC 2.png
To View, All Your Shared Files Get Into ShareIt Folder To View All Your Files.
That is The Process Of File Sharing Between Android And PC Platforms.
I Hope you've UnderStood. In the event that You have any questions, remark underneath in the remark area and Feel Free to share This Tips it to your companions … !!!
Read another post Click here
Thank you for reading!
Best 5
3:09 AM
Best 5 Android apps for education
In Everyone's Life, There Is An Important Step Which Is Unable To Skip. For sure, Education Is One Of The Most Important Step In Our Life And Has Some Gole's Like To Be An Engineer, Doctor, Wild Photographer, Fashion Designer, VFX Artist, etc.. Development Has Been Increasing a Lot Whether It Comes To Education, Entertainment, Life Style. Also, Technology Has Increased a Lot In Education As We Seen There Is A Lot Of Video Available On YouTube That Helps Most Of The Students To Understand Easily In Their Mother Tongue Languages. Further, There Is a Lot Of Some Free Courses Available On Internet Which We Can Learn With Our SmartPhone. Today I Took Some Of The Apps That Helps Most Of The Students In Their Educational Life That I Mentioned In This Article " Here Is The 5 Best Apps For Students That They Should Try It Now..!!! ". Let's Check It Out What Are The Apps And How They Help In The Life Of Student.
 |
| Best 5 Android apps for education |
HERE IS THE LIST OF APPS
- Khan Academy
- U – Dictionary.
- Socratic – Math Answers & Homework Help.
- Hello English: Learn English.
- My Script Calculator.
1. Khan Academy
Khan Academy Is One Of The Top Most Educational Website Which Is A Non-Profit Educational Organization Created In The Year 2006. Through Khan Academy, We Can Learn EveryThing Which Covers Most Of The Subjects From Math, Science and Engineering, Computing, Art and Humanities, Economics and Finance, And Test Papers For IIT JEE, MCAT, SAT, etc… [ A – Z ]. It Provides Video Tutorials To Understand Easily. It Helps Most Of The Students Those Who Are Unwilling To Pay Fee For Their Education Khan Academy Is The Best Choice To Learn EveryThing By Installing The App On SmartPhone.
 |
| Best 5 Android apps for education |
 |
| Best 5 Android apps for education |
2. U – Dictionary
The Second App Is U – Dictionary And It's One Of The Top Most Best Offline Dictionary App To Find Meaning Of The Word Moreover, We Can Translate Any Word By Copying The Text From Any App. There Is A 38 International Language Translator Packages Are Available. We Can Use This App Even In Offline By Downloading The Packages.
3. Socratic – Math Answers and Homework Help.
The Third App Is Socratic –Math Answer and HomeWork Helper Helps You [Or] Your Children's To Get Away From Stress And Pressure In Studies Which Covers Most Of The Subjects Easily In Finding The Solutions To The Problems in a Seconds Of Time By Just Placing Your Mobile Phone Infront Of Your Questions ( Take a Pic Of Any Questions ). Google Announced The Year Of The App of 2017 Go To Socratic, Check Out This To Know More Socratic – Math Answer and HomeWork Helper.
4. Hello there English: Learn English
The Fourth App Is Hello English, Most Of The Students Interested In Learning English By Using The Help Of Some Apps Available In Play Store But It's Feels Uncomfortable To Learn. What's more, We Can English Fore Free From 22 Languages Our [ Regional Language ]. We Can Go With This Hello English App And We Can Use This App Offline Without Internet Connection.
5. My Script Calculator
Heading off To Our Last App Is My Script Calculator, Most Of The Students Are Using Mobile Calculator To Get Solution For The Mathematics Problems, Most Of Us Feel Uncomfortable While Using The Inbuilt Calculator App For Solving The Math Problems. We Miss Some Of The Math Signatures In The Calculator App. Moreover, My Script Calculator Helps You a Lot In Solving The Mathematics Problems. CheckOut This Video To Know More About The App My Script Calculator.
Snap HERE TO DOWNLOAD THE APP
I Hope you've UnderStood." Here Is The 5 Best Apps For Students That They Should Try It Now..!!!". If You have any inquiries, comment underneath in the comment section and Feel Free to share This Tips it to your sidekicks … !!!
Thank you for reading!
Wednesday, June 19, 2019
Tip & tricks
7:05 AM
Top 10 best Android tricks your smartphone can do
Your Android cell phone is equipped for a wide assortment of things, however chances are there are a great deal of things you had no clue your ground-breaking little pocket PC could do.
 |
| Top 10 best Android tricks your smartphone can do |
These 10 cool capacities will make them hotshot your capacities to your companions and having them ask you where you learned everything – you can interface them here and share the information, obviously!
1. Cast your telephone screen to your preferred TV
Go to the Quick Settings menu and chooseCast. Your gadget will spring up the Chromecast that is set up, or the TV of your decision (if it's a brilliant TV) and you can begin throwing. It's straightforward, and snappy to set up.
2. Lock individuals out of explicit applications
 We've all been there - somebody's approached to utilize our telephone, and we've mixed to shroud certain photos and data we don't need others to see. There's really a path with Android gadgets to conceal this with a couple of catch presses so anybody you loan your telephone to for a couple of minutes might be bolted to one region until you enter your telephone's lock screen code. That way, they can't utilize portions of your telephone except if you put the code in once more.
 Go to Settings, at that point Security, and turn on Screen Pinning. At the point when turned on, open the application that your companion or cherished one needs to utilize. Open Overview with the square catch beneath the telephone screen. You'll see a symbol that resembles a stick in the lower right corner. Tap it, and it'll remain stuck to the front. Voila! Well that is everything anybody can use until you enter the secret phrase.
3. Empower one-gave mode
Some Android telephone sizes can be especially awkward, contingent upon the model you use. Fortunately, you can settle on the uncommon one-gave mode on most Android telephones utilizing one brisk alternate way. It's on Google's console, which you'll have to get in the event that you don't have it. You'll likely have it as of now as your default alternative on the off chance that you utilize a Pixel or Nexus telephone, yet on the off chance that you utilize a Samsung or LG telephone, you'll have to download the console to prepare things.When you download the console, open it up and tap and hold the oblique punctuation line key. Dismantle up to one side hand symbol to turn on one-gave mode. There will be a bolt here that gives you a chance to position the console from side to side and reposition it. The symbol on the top will give you a chance to reestablish the console to its full size. Presently the console can be utilized with one hand in the event that you so want.
4. Change out remote systems rapidly.
In some cases you may need to swap between remote systems in a practical way. Maybe you're on the wrong system at a lodging or you need to utilize a companion's sign rather than your hotspot. Rather than going to Settings and after that Wi-Fi, basically swipe down twice from the highest point of your screen and open the Quick Settingsmenu. Push on the name of the system you're associated with and you'll be given a whole rundown of systems surrounding you. You would now be able to swap to a qualified system from that point.
5. Swap into Priority Mode
You may never have known about Android's Priority Mode, yet it's a very valuable element. It gives you a chance to put your telephone in "Don't bother" mode while as yet giving certain notices a chance to get through that you select. Basically, you'll have the option to pick who can trouble you while everything else is napped.
 Begin by going to Settings, at that point Sound and Notification, at that point Do not aggravate. From that point, switch up the settings and notices that regardless you need to let through. You can turn it now and again rapidly by means of Quick Settings, yet it will let through significant people, and that is the thing that makes it so cool.
6. Peruse notices you inadvertently shut
It tends to be anything but difficult to carelessly swipe away a notice that you intended to peruse. It's easy to bring one back, however your telephone doesn't make it self-evident. You can see the majority of your ongoing warnings on the off chance that you'd like, really. Simply tap and hang on a vacant piece of your home screen. Select the Choose Widgets alternative, at that point search for Settings. Drag the symbol to a space on your home screen and you'll see a rundown spring up. Select Notification Log, and afterward tap the symbol. You'll currently have the option to look through the majority of your gadget's warnings.
7. Clear your default applications
Now and again, you'll open a connection that prompts the relating application to stack, for example, YouTube, Facebook, or Twitter, when you intended to stack it in the program. You can clear the default application posting and shield this from occurring in an extremely basic manner so you can keep perusing without changing out applications when you didn't intend to in any case.
Go to Settings, at that point Apps, and search for the application you need to quit opening up. Discover Open By Default when you've found it, and pick Clear Defaults. Not any more annoying application stacking!
8. Empower Smart Lock
Keeping your telephone secure is dependably a need, however when you're home and relaxing around possibly you're not as intrigued as locking all that you can. You should need to evaluate Smart Lock, which removes the prerequisite to utilize a keypad lock when in a believed zone like your home. You can select to utilize your face, remote systems, GPS areas, and more to keep your telephone from locking. Thusly you don't need to enter your secret phrase each time.
Go to Settings, at that point Security, at that point Smart Lockto get it set up, and lounge in the light of straightforward telephone utilization when in confided in zones.
9. Change free volume settings
When you go to change the sound on a specific part of your gadget, you're presumably inadvertently continually turning one section down, yet not the one you intended to, isn't that so? Possibly you turned down the telephone's volume totally, yet you implied distinctly to change your ringtone's volume.
Rather than depending on your volume catches, tap the physical volume catches on your telephone, and search for the volume setting to appear on your screen. Search for a bolt on the container, tap it, and look at the volume sliders here to physically modify the ones you need to change. Presently you can do this rapidly and effectively.
10. Encode your telephone's information
It's dependably a smart thought to guard your information, regardless of whether you don't house much private data on your telephone. You can very empower encryption on your telephone, which will make it indiscernible by outside gatherings without a PIN or secret phrase to unscramble it. It's exceptionally easy to turn on: Go to Settings, at that point Security, at that point pick the Encrypt Phone choice.
It can require a significant stretch of time to empower if your telephone wasn't recently scrambled, and could conceivably make your telephone back off in case you're running a more seasoned form of Android, however it's an important advance to take in the event that you need to ensure the things as of now on your telephone.


